Monday, November 8, 2010

Two Classic Meatloaf Recipes


Meatloaf is one of the classic comfort foods. An inextricable part of childhood, we all grew up with a family version of 'the perfect meatloaf' — each with it's own unique flavour, texture and aroma — bringing back memories from the halcyon days of our youth. There are as many interpretations of this humble dish as there are Moms and Grandmas, each guardians of their own special recipe. Naturally, some get passed down, generation to generation, and acquire the special moniker of authorship, like Nana's Banana Cream Pie or Mom's Classic Meatloaf. My Mom's Classic Meatloaf is the best, but sometimes it's healthy to shake the tree a little and try new things, like my Turkey & Mushroom Meatloaf. A light and tasty low fat version of the family classic, my recipe with ground turkey and sautéed mushrooms, onions and garlic is a healthy non-beef option for those meatloaf lovers looking for another string in their culinary bow!


Mom's Classic Meatloaf
Serves 4-6


1 lb lean ground beef
1 tin Tomato Rice Soup
1 cup oatmeal
1 egg, beaten
1 tsp Worcestershire Sauce
1 tsp dried sage
1 tsp dried basil
1/2 cup freshly grated parmesan cheese


Combine all the ingredients except the cheese, in a bowl and mix to combine. Season with salt and pepper. Press the mixture into a loaf pan and sprinkle with parmesan cheese. Bake at 350° for 50-60 minutes until lightly browned on top and cooked through.


Turkey & Mushroom Meatloaf
Serves 4-6


2 tbsp vegetable oil
2 onions, peeled and finely diced
4 garlic cloves, minced
8 oz. cremini or white button mushrooms, cleaned and finely chopped
2 lb ground turkey
1/2 cup milk
1 cup fresh breadcrumbs
2 eggs, beaten
1 156 ml can tomato paste
1 tsp Worcestershire sauce
1 tbsp dried thyme and oregano
salt and pepper to taste
1/2 cup ketchup

  1. Preheat oven to 350°. In a heavy skillet over medium-high heat, add oil and onions, and sauté until they are golden brown, about 6-8 minutes. Add the garlic and mushrooms and continue to sauté until all the liquid has evaporate and the mushrooms have browned slightly.
  2. In a large bowl, mix together the turkey, milk, breadcrumbs, beaten eggs, tomato paste, worcestershire sauce, thyme, oregano and mushroom mixture. Season well with salt and pepper, and combine thoroughly. 
  3. Press the mixture into a loaf pan and spread the ketchup over the top. Bake until lightly browned on top and firm to the touch, about 60-75 minutes, or when a thermometer reads 165° in the thickest part. I would serve this with another comfort food, mashed potatoes, a small mixed green salad, and an old film on the TV.


Friday, November 5, 2010

Refreshing, Chilled Pea Soup


Over the summer I fell in love with this cool and creamy Chilled Pea Soup. Vibrant green in colour, it's like springtime in a bowl. The peas and fresh mint come together in a perfect marriage bursting with flavour. The addition of a little buttermilk makes this soup light and delicious and a refreshing first course to any meal. Wonderfully silky and smooth, it is also unbelievably quick and easy to make. You'll be in and out of the kitchen within half an hour! The soup also transports easily. I made it just ahead of time for a cottage weekend, and simply stored it in a plastic jug for the drive up north. When lunch was to be served the following day, I simply retrieved my jug from the refrigerator and discreetly poured the chilled soup into the bowls, garnishing with a little cream and fresh chives. The soup was the perfect beginning to a lovely long leisurely al fresco lunch, and a great success all round. Effort, what effort?


Chilled Pea Soup
Serves 4


2 tbsp butter
1 cup chopped onion
3 cups chicken stock
3 cups frozen peas
3 tbsp chopped mint
1 cup buttermilk
salt and white pepper to taste
1/4 cup chopped chives

  1. Heat butter in a pot over medium heat. Add onions and sauté 3 minutes or until softened. Add chicken stock, peas, mint and bring to a boil. Reduce the heat and simmer for 3 minutes or until the peas are tender.
  2. Pour in a blender and purée until smooth. Use a slotted spoon and pull out any stubborn peas that refused to cooperate, and discard. Stir in the buttermilk and season with salt and white pepper. 
  3. Chill. 
  4. Stir in a decorative drizzle of whipping cream and garnish with chives.

Thursday, November 4, 2010

Salmon, Caviar & Cannellini Bean Canapés


I love salmon, but I adore salmon gravlax. Every Christmas, my husband and I make homemade gravlax by curing a whole side of salmon with fresh dill, sugar and salt, and letting it marinate for 24 hours under the weight of a brick. I admit that it takes great willpower not to gobble up the whole thing right then and there, but what would be left for our guests? Fortified with that humbling thought, I usually leave a few morsels. Cannellini beans are another favourite of mine, low in fat, high in fibre and twice as much iron as beef! Even caviar is good for you, with the same healthy omega-3 fatty acids as salmon. So, in addition to being a nutritional powerhouse, these Salmon, Caviar and Cannellini Bean Canapés look and taste absolutely fabulous! Just watch them disappear.


Salmon, Caviar & Cannellini Bean Canapés
(makes 20)

8-10 slices multigrain bread
250 g canned cannellini beans, drained
1-2 tbsp lime juice
2 tbsp dill, finely chopped
2 tbsp chives, finely sliced
1 tbsp capers, finely chopped

2 tsp shallot, finely minced
salt, pepper to taste
100 g thinly sliced gravlax or smoked salmon
2 tbsp caviar or salmon roe
20 dill tops for decoration

  1. Using a cookie cutter, cut 2" rounds out of the bread slices, enough for 20 bases, and bake in a 350° oven until crisp and slightly browned. Set aside on wire rack.
  2. Make the cannelini bean spread by puréeing the beans with the lime juice until smooth, stir in the herbs, shallot and capers and season to taste.
  3. Spread a generous amount of the cannelini bean paste on each of the toasted bases, top decoratively with some salmon and caviar, then finish off with a dill top.

COOK'S NOTE: Both the beans and the bases can be prepared at least a day in advance, if kept in an airtight container. My recipe for homemade Gravlax can be found in my cookbook — The Everyday Gourmet at blurb.com

Wednesday, November 3, 2010

Grilled Tiger Shrimp with Chipotle Mayo


These Grilled Tiger Shrimp are simply the best appetizer in the world. Not only are they delicious, but they're also low in fat! And that combination makes them a recipe worth knowing about and sharing with friends. I've made this recipe countless times, and they are always the first appetizer to disappear. The secret is the very simple marinade of olive oil, lime juice, garlic, scallions and cilantro, which when left to do its magic, results in wonderfully succulent and tangy 'sea bugs'. 


The Chipotle Mayo offers a smoky counterpoint to the fresh tangy flavours of the tiger shrimp, which you can buy pre-made from Mike's Fish Market at the St. Lawrence Market or make it from scratch. I always buy colossal tiger shrimp when making this recipe, which makes for a spectacular presentation, but you can also use large or extra large. Just ask Bubba!


Grilled Tiger Shrimp with Chipotle Mayo
Serves 6 guests - 4 pieces each

Shrimp:
3 tbsp fresh lime juice
2 tbsp olive oil
1/4 cup fresh cilantro, chopped
3 scallions, chopped
2 garlic cloves, minced
salt
24 colossal tiger shrimp, peeled and deveined

Chipotle Mayonnaise:
1 cup mayonnaise
3 canned chipotles in adobo sauce
1 tbsp adobo sauce
1/2 lime, juice
  1. Combine the lime juice, oil, cilantro, scallions, garlic and a pinch of salt in a bowl. Add the shrimp and toss to coat. Cover the bowl with cling wrap or store in a resealable plastic bag, and marinate in the refrigerator for at least 1 hour or up to 8 hours, turning occasionally.
  2. For the Chipotle Mayonnaise, add all the ingredients in a food processor and blend. Cover and keep refrigerated until ready to use.
  3. Heat a grill or grill pan to medium-high. Drain marinade from shrimp and discard. Grill shrimp until just opaque, about 3 minutes per side. Serve either warm or at room temperature with some spicy chipotle mayonnaise.


Tuesday, November 2, 2010

Chicken in Thai Green Curry


An aromatic curry is a soothing dish as the cold weather approaches, and this spicy flavourful Thai scented curry with coconut milk, red peppers, water chestnuts and fresh lime and basil leaves, will definitely warm you up! A harmony of satisfying tastes and textures, Chicken in Thai Green Curry is a feast for the eyes, nose and palate. Lovely served with a small bowl of Jasmin rice on the side, this Thai curry is one of our favourite recipes, whatever the weather.


'Thai Kitchen' makes the cooking process even easier with their Green and Red Curry Pastes which you can find in most grocery stores these days. These pastes are also great as a marinade for grilled chicken and seafood, and brushed with a little coconut milk, you'd think you were in Bangkok. I was first introduced to Chicken in Thai Green Curry at 'Young Thailand', a wonderful Thai restaurant in Toronto, run by Wandee Young, who is credited with opening the first Thai restaurant in Canada in 1980, and also co-writing a cookbook with Byron Ayanoglu — The Young Thailand Cookbook — a great cookbook with many of the Thai culinary classics written in a clear, concise and entertaining manner. For anyone wanting to know more about "tastes that tingle your tongue", this is the recipe and cookbook for you.


Chicken in Thai Green Curry (Kaeng Khiao Wan Kai)
Serves 4


10 oz skinless boneless chicken breasts
3 cups unsweetened coconut mik
2 tbsp green curry paste (Thai Kitchen is a good brand)
4 lime leaves
1 cup water
3 tbsp fish sauce
1 tsp sugar
1 cup bamboo shoot strips
1/2 cup water chestnuts, sliced
1/2 medium red pepper, cut in thin strips
2 tbsp green peas
20 fresh basil leaves, whole + 2 sprigs for garnish
Jasmin or white rice, cooked according to instructions


  1. Slice the chicken breasts into thin strips, 1/4" thick, 2" long and 1" wide.
  2. Heat 1 cup of coconut milk in a wok or large saucepan, over high heat until it boils. Add green curry paste and, reducing the heat to medium, stir to dissolve it in the coconut milk. Add second cup of coconut milk, raise the heat to maximum and let it cook 8-10 minutes until the sauce thickens somewhat. Slice the lime leaves into thin strips and add to the sauce. Turn the heat back to medium and cook for 2 minutes.
  3. Turn the heat back to maximum, adding the chicken, then add the last cup of coconut milk as well as 1 cup water. Stir-cook for 1 minute until the mixture is bubbling happily. Add the fish sauce and sugar and stir-cook for 2 minutes, until it's bubbling hard.
  4. Add the bamboo shoots and water chestnuts and stir-cook for 2 minutes. Then add the red pepper, green peas and whole basil. Stir-cook 2-3 minutes, folding all the ingredients together into the sauce.
  5. Take the sauce off the heat and transfer to a warmed deep serving dish, topping with a sprig or two of basil, and serve with steamed rice.

Monday, November 1, 2010

Manita's Chicken Marbella


My dear friend Manita made this dish, Chicken Marbella, for one of her famous dinner parties quite a few years ago. She loves to entertain — the more people the better. The challenge was always fitting her huge group of friends into her small 600 square foot apartment, which usually meant stringing together a great number of odd shaped tables from one end of the apartment to the other. Dinner would be cosy, but always great fun — Manita made sure of that! 


A generous host, she is also a fabulous cook. Chicken Marbella was one of her indispensable recipes for entertaining large parties of guests. Conveniently, the ingredients marinate overnight, which intensifies their fabulous flavours, and makes the final cooking step the next day a breeze. The dish bursts with flavour and the presentation is spectacular — a festive assortment of colourful dried apricots and prunes, bright green olives, piquant capers and aromatic cilantro. Manita served the dish with Nutted Wild Rice, perfect for soaking up all the flavourful juices. 


Her recipe for Chicken Marbella and Nutted Wild Rice was inspired by Sheila Lukins and Julie Rosso and their amazing cookbook – The Silver Palate — which was, and still is, one of my favourite and most thumbed-through cookbooks. It's been much too long since I've seen Manita, who has since moved to Miami, but all I have to do is make her Chicken Marbella, and I'm transported back 20 years trying to find my spot at her dinner table, wedged somewhere between my friend Paul's canvas and a stack of Bon Appétit magazines. 


Chicken Marbella
Serves 10-12


4 Chickens, 2.5 lb each, quartered
1 head of garlic, peeled and finely puréed
1/4 cup dried oregano
coarse salt and fresh ground pepper, to taste
1/2 cup red wine vinegar
1/2 cup olive oil
1 cup pitted prunes
1 cup dried apricots
1/2 cup pitted Spanish green olives
1/2 cup capers with a bit of juice
6 bay leaves
1 cup brown sugar
1 cup white wine
1/4 cup fresh cilantro, finely chopped


  1. In a large bowl combine chicken pieces, garlic, oregano, vinegar, olive oil, prunes, apricots, olives, capers and juice, bay leaves and salt and pepper to taste. Cover and let marinate refrigerated overnight. 
  2. Preheat oven to 350°
  3. Arrange chicken in a single layer in one or two shallow cooking dishes and spoon marinade over it evenly. Sprinkle chicken pieces with brown sugar and  and pour white wine around them.
  4. Bake for 50-60 minutes, basting frequently with the pan juices. Chicken is done when the thigh pieces are done.
  5. With a slotted spoon transfer the chicken , prunes, apricots, olives and capers to a serving platter. Moisten with a spoonful or two of pan juices and sprinkle with cilantro. Pass the remaining juices in a sauceboat.
  6. To serve Chicken Marbella cold, cool to room temperature in cooking juices before transferring to a serving platter. If chicken has been covered and refrigerated, allow it to return to room temperature before serving, and spoon some of the reserved juice over the chicken. Yum-yum.


Friday, October 29, 2010

The Season for Braising


As the colder weather approaches, there is something very comforting about a dish that has been cooking for hours, infusing your home with the inviting aromas of wonderful things to come. Granted, it seems like a luxury to have hours to spend on such an endeavour, except on weekends, but in reality, with a braise the effort is all at the front end — in the preparation. Once it's in the oven you can carry on doing other things, and the wonders of the braise takes over. The results are meltingly tender! Many chefs become reverential when discussing the transformative effects of braising meat.


Essentially, braising relies on heat, time and moisture to break down the connective tissue of meat, which is why it makes it an ideal way to cook tougher inexpensive cuts of meat, like pot roasts, rumps, shanks and ribs. Most braises follow the same basic steps: The meat is first seared to brown its surface and enhance the flavour. Second, an acidic element like tomatoes or wine is added to the pot, often with stock. Third, the pot is then covered and left to simmer until the meat is falling-off-the-bone tender and amazingly flavourful. A successful braise intermingles the flavours of the foods being cooked with the braising liquid, dissolving the collagen in the meat to gelatin. The gelatin enriches and adds body to the liquid, which produces an enormously flavourful sauce. 


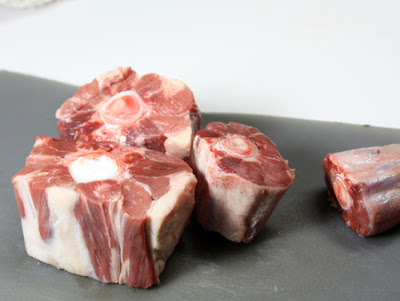
One of our favourite recipes in the colder months, when we all crave warmer richer meals, is Braised Oxtail. It's not a particularly handsome cut of meat, but what it lacks in looks, it makes up for in taste. North Americans aren't as fond of oxtail as Europeans, but if you enjoy a meaty, gelatinous braise of flavourful beef, this is the dish for you. Served with a generous portion of the flavourful sauce and a dollop of mashed potatoes, it's no wonder it's one of our faves. 


Braised Oxtail Stew


2 oxtail, cut into 2" pieces
3/4 cups flour
3 tbsp olive oil
3 cups beef stock
1 cup red wine
1 cup tomato juice
3 tbsp tomato paste
2 garlic cloves, minced
3 bay leaves
3 thyme sprigs (or 1tsp dried)
1/2 tsp grated nutmeg
1 tsp salt
1 tsp freshly ground black pepper
2 cups yellow onions, coarsely chopped
1 cup celery, diced
1 cup carrots, cut into 1/8" rounds
chopped parsley for garnish


  1. Pat dry oxtails and dredge in flour until thoroughly coated. 
  2. Heat oil in large oven proof cooking pot, and brown the oxtails well in several batches, setting each batch aside until all are browned; return all oxtails to pot.
  3. Add stock, wine, tomato juice and tomato paste. Stir in garlic, bay leaves, thyme, nutmeg, salt and pepper. Add vegetables, immersing them well in the liquid.
  4. Set the pot over medium heat. Bring to a boil, cover, reduce heat, and simmer 2 hours or until oxtails are ver tender. Taste and correct seasoning. Skim fat from the sauce. Serve the oxtails in a warm serving dish with some of the sauce on top, and garnish with some parsley.