Friday, September 17, 2010

Marcella's Tagliatelle with Bolognese Meat Sauce


  • I do love to cook. Especially when guests are expected, I like to try out recipes that either require a little more work or time, or are by their nature, extravagant. Like making a grand Paella, or a prime rib of beef with yorkshire pudding. That kind of thing. I guess it's the festive nature of the occasions when we get together with special friends or loved ones. I was given Marcella Hazan's Essentials of Italian Cooking one Christmas. It's an inspiring book full of authentic Italian recipes and useful techniques that capture the essence of true italian cooking, from a woman who is passionate about Cucina Italiana.


Marcella and her husband Victor, who are now both well into their 80's, live part of their year in Venice, Italy, and the other part of the year on Longboat Key, Florida. My parents spend half their year on Longboat Key too, and the whole family just got back from Venice earlier this year, so I feel a bond with Marcella, however tenuous that might be! 


One Autumn weekend when my husband and I were invited out of the city to a friend's cottage, we decided we'd make Marcella Hazan's Tagliatelle with Bolognese Sauce. We arrived early Friday afternoon, hours before the hosts and other 2 guests were expected. A bit embarrassing, but it gave us an opportunity to get a head start on the Bolognese, which we would be serving that night. 

The traditional recipe is a Ragu which originated in Bologna, and uses soft ribbon-like tagliatelle — not spaghetti! It's also sweeter than the typical North American sauce we all grew up with — cooking the meat in milk before adding the wine and tomatoes, protects it from the acidic bite of the latter, the result being a mellow, gentle and comfortable flavour. Surprisingly, it only takes about 1/2 hour to prepare, just a lot of chopping. But simmering is the key. Marcella recommends a simmering time of 3 hours, but if you have the time, let the sauce simmer over low heat for 4-6 hours. Just be sure to stir it regularly with a wooden spoon so that the sauce doesn't stick. The principle is simple: the longer the sauce simmers, the richer the flavour and consistency becomes. 

Judging from the Ragu with Tagliatelle we served that Friday night, it is worth the wait. There were no left overs and it was unanimously embraced as being truly outstanding by a table full of dedicated gastronomes. And as Marcella says, 
"There is no more perfect union in all gastronomy than the marriage of Bolognese ragu with homemade Bolognese tagliatelle."


  • Marcella Hazan's Tagliatelle with Bolognese Meat Sauce

  • 1 tbsp vegetable oil
  • 3 tbsp butter plus 1 tablespoon for tossing with the pasta
  • 1/2 cup chopped onion
  • 2/3 cup chopped celery
  • 2/3 cup chopped carrot
  • 3/4 pound ground beef 
  • Salt
  • Freshly ground black pepper
  • 1 cup whole milk 
  • Whole nutmeg for grating
  • 1 cup dry white wine
  • 1 1/2 cups canned imported Italian plum tomatoes, cut up, with their juice
  • 1 1/4 to 1 1/2 pounds tagliatelle pasta
  • Freshly grated parmigiano-reggiano at the table

  • Put the oil, butter, and chopped onion in a heavy-bottomed pot and turn the heat to medium. Cook and stir the onion until it has become translucent, then add the chopped celery and carrot. Cook for about 2 minutes, stirring the vegetables to coat them well.

  • Add the meat, a large pinch of salt, and some freshly ground pepper. Crumble the meat up with a fork, stir well, and cook until the meat has lost its red raw color.

  • Add the milk and let it simmer gently, stirring frequently, until it bubbles away completely. Stir in about 1/8 teaspoon freshly ground nutmeg.

  • Add the wine and let it simmer away until it has evaporated, then add in the tomatoes and stir thoroughly to coat all the ingredients well. When they begin to bubble, turn the heat down so that the sauce cooks at the laziest of simmers, with just an intermittent bubble breaking through to the surface. Cook, uncovered, for 3 hours (or more—she says more is better), stirring from time to time. If the sauce begins to dry out, add 1/2 cup of water whenever necessary to keep it from sticking. At the end, there should be no water left, and the fat must separate from the sauce. Taste and correct for salt.

  • Toss with cooked, drained tagliatelle and the remaining tablespoon of butter. Serve freshly grated parmesan cheese on the side. And if you're feeling particularly naughty, an oven baked baguette with butter and garlic wouldn't go amiss!
    Serves 6


Thursday, September 16, 2010

Delicious Beef and Mushroom Stew


We had a fabulously warm summer here in Toronto, then whammo, the temperature plummets and it's suddenly Autumn. So not only is it time to start thinking about packing away summer clothes, but it may also be time to start thinking about wearing socks and sweaters. Okay, it's not winter yet, but if I tell you about this recipe, maybe I'll feel warmer — it's one of my favourite winter recipes — Beef and Mushroom Stew. A few years ago, my neighbours Clarke and Dorothea made a delicious beef dish using very special forest mushrooms that had been brought over by Angela, Dorothea's sister, who was visiting from Germany.


Needless to say, it was a very special meal and one that I tried over and over to reproduce. I don't have access to the German 'mushroom underground', but I do know that my Beef and Mushroom Stew is one of my absolute favourite winter dishes. I often serve it on a bed of wide egg noodles that have been tossed with some butter, crushed caraway seeds and chopped parsley. Schmeckt gut!

Beef and Mushroom Stew

1 tbsp unsalted butter
1 tbsp olive oil
2 slices bacon, finely chopped
1 onion, peeled and chopped
2 cloves garlic, minced
1 carrot, peeled and sliced into thick coins
1 stalk celery, thinly sliced
1 tsp worcestershire sauce
1 bay leaf
2 tsp dried thyme or 3 sprigs fresh
1/2 tsp freshly ground black pepper
1/2 tsp salt
1/4 tsp cayenne pepper
1/4 cup flour
2 lb stewing beef
1/2 cup red wine
2 cups chicken stock
1-1/2 cups peeled white pearl or cipollini onions
1/2 lb button mushrooms, cleaned and left whole
1 cup sour cream (not low fat)
2 tbsp fresh flat leaf italian parsley, chopped for garnish

In a large cooking pot over medium heat, melt butter and oil. Add bacon pieces and cook, stirring often until bacon starts to brown. Add onion, garlic, carrots, celery, worcestershire sauce, herbs and spices, and cook, stirring often, until onion is softened, about 5 minutes.

Pat beef cubes dry with a paper towel, then dredge in flour until cubes are evenly coated. Increase the heat under the cooking pot to medium-high and cook beef, adding a few pieces at a time, letting pieces brown before adding new ones. When all the beef cubes have browned, add wine to pan and cook for 1 minute, stirring and scraping up any brown bits on bottom of pan. Add chicken stock and bring to a boil.

Reduce heat to low, partially cover pot, and let simmer for 1 hour. Stir in pearl or cipollini onions, and continue to cook on low heat, partially covered for another hour. Remove pot lid and add mushrooms; simmer for 30 minutes. Beef should be very tender. Just before serving, remove pot from heat, remove bay leaf and stir in sour cream and parsley, then return the pot to the heat and gently heat through, not allowing it to boil.

Serve with wide egg noodles tossed with butter, crushed caraway seeds and parsley.

Serves 6-8

Wednesday, September 15, 2010

Grandmother Dingman's Bermuda Cheese Wafers


Just got back from 4 days in Bermuda at the Pink Beach Club with my husband Guy and 3 close friends. The last time I was in Bermuda was 20 years ago with an old boyfriend. We stayed at his grandmother's wonderful hilltop home, which she and her husband had built in the 1950's. It overlooked Smith's Parish with sweeping views of the south end of the island.


Grandmother 'Mum' Dingman was a great character — larger than life — and a significant presence in the lives of her family and the island itself. She was the original Bermuda Pink Sand Lady — years ago she approached airlines to donate their used miniature liquor bottles (back when they were made of glass), which she washed and filled with pink sand, and then painted the little bottle caps with pink nail polish! The bottles were sold to tourists as souvenirs and all proceeds went to charity. What a great lady.


Grandmother Dingman would also host wonderful cocktail parties on the terrace of her hilltop home. One evening, while I was staying with her, she made a simple hors d'oeuvre to have with our gin and tonics that night — her famous Cheese Wafers — which she made with rice krispies! To my great surprise, they were outstandingly good. So good in fact that I jotted down the recipe that night so I wouldn't forget it. They were light, crispy, packed with great flavour and a wee bit of heat. Grandmother Dingman has since passed away, but I still have her recipe. Whenever I make them I think of her and how nice she was to me during our short time together.


Grandmother Dingman's Rice Krispie Cheese Wafers

2 cups cheddar cheese, grated
1 cup unsalted butter, at room temperature
1 cup flour
3 cups rice krispies
1/8 tsp cayenne pepper
1/4 tsp curry powder

Mix the cheese and butter together, then add the flour and spices. Mix well. Add the rice krispies and mix gently. Shape into small balls and place on an ungreased cookie sheet. Flatten each ball with a fork and bake 10 minutes at 375° until puffed and golden. Makes about 15-20 wafers.

Serve with cocktails.


Tuesday, September 14, 2010

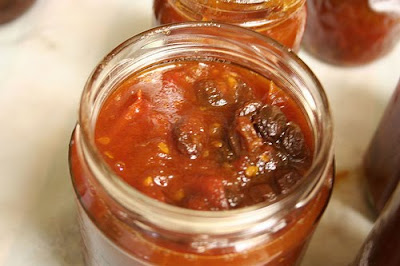
Spicy Tomato Chutney


I don't 'can' or 'pickle' as a rule, however I make an exception for this delicious Tomato Chutney, which is both savoury and sweet. Late summer or early autumn is the perfect time for making this recipe, when plum tomatoes are plentiful. It goes really well with pork tenderloin, grilled chicken and cheese sandwiches. Homemade chutneys make great holiday gifts, so I sometimes double the recipe if I plan on putting it under the Christmas tree for special friends and family members.


Spicy Tomato Chutney

Ingredients:

10 medium ripe plum tomatoes (1kg), peeled and chopped
2 large red McIntosh apples, peeled and chopped in small dice
2 medium yellow onions, peeled and chopped in small dice
1-1/2 cups brown cider vinegar
1 cups brown sugar, firmly packed
1/4 tsp chili powder
1/2 tsp dry mustard
3/4 cups sultanas
1 clove garlic, crushed
2 tsp curry powder
2 tsp ground allspice

Equipment:

8 x 8 sterlized 250ml Bernardin canning jars, screw caps and 'snap lids'
non-metallic funnel
tongs

Combine all the ingredients in a large saucepan and stir over medium heat, until sugar is dissolved. Bring to a boil, then simmer uncovered for 1 hour, stirring occasionally. Meanwhile sterilize the mason jars according to Bernardin 'step-by-step home canning' instructions — but in short, place the jars in a pot of boiling water, keeping jars hot until ready to use. Set screw tops aside and place 'snap lids' in a pot of hot, but not boiling water. While the chutney is very hot, remove the jars from the boiling water using tongs, tilting out the excess water. Using a non-metallic funnel, ladle the chutney into the sterilized mason jars, quickly top the jar with a hot 'snap lid' and fasten with the screw cap — firm but not tight. Repeat for remaining jars. After a few minutes, the 'snap lids' will in fact make a distinctive snapping noise which lets you know the seal succeeded! The screw cap can then be tightened, but let the jars cool before storing for future use.

Note: If the 'snap lid' does not make the snapping noise, sterilize the jars again and refill with heated chutney. Timing is everything — the first time I made this Tomato Chutney, none of my lids snapped!  I had to re-sterilize all the mason jars, reheat the chutney and try again. It worked the second try and it's worked every year since. Judging by the empty jars I get back after Christmas each year, this recipe is a winner.

Makes 8 250ml jars

Monday, September 13, 2010

The Reuben Sandwich


The best sandwich in the world is a Grilled Cheese Sandwich. It's an empirical fact. Logically, it follows then that The Reuben is one of the best sandwiches in the world. It's simple fare: savoury corned beef, gooey swiss cheese, salty sauerkraut and tangy russian dressing on crunchy grilled rye bread. When those simple ingredients come together, it becomes something close to culinary heaven. There are couple of stories about the creation of the Reuben, but I figure it has to have been born in NYC. Some say Reuben, founder of Reuben’s Restaurant and Delicatessen in New York, made the first Reuben Sandwich in 1914, as chronicled by Craig Claiborne of the New York Times:
"The year was 1914. Late one evening a leading lady of actor Charlie Chaplin came into the restaurant and said, 'Reuben, make me a sandwich, I'm so hungry I could eat a brick.' He took a loaf of rye bread, cut two slices and stacked one piece with sliced Virginia ham, roast turkey, and imported Swiss cheese, topped off with coleslaw and lots of Reuben's special Russian dressing and the second slice of bread. He served it to the lady who said, 'Gee, Reuben, this is the best sandwich I ever ate, you ought to call it an Annette Seelos Special.' To which he replied, 'Like hell I will, I'll call it a Reuben's Special.'"
On the other hand, some cite Reuben Kay, a wholesale grocer in Omaha, Nebraska—who supposedly made the eponymous sandwich for poker games at the Blackstone Hotel in the 1920s—as its creator. I don't really care where it came from, as Kelsey says "it's bloody marvelous".


The Reuben Sandwich


4 tbsp butter, softened
8 slices onion caraway rye bread
8 slices Swiss cheese
3/4 lb corned beef, thinly sliced
1/2 lb sauerkraut 
1/4 cup Russian Dressing

Russian Dressing
(Makes one-half cup)
1/3 cup mayonnaise
1 1/2 Tbsp ketchup
1 1/2 teaspoons prepared horseradish
1/2 teaspoon Worcestershire sauce
Salt, to taste
Freshly ground black pepper, to taste


Butter generously one side of four slices of bread, and place the slices buttered-side down on a flat surface. Top each with a slice of Swiss cheese, and then divide half of the corned beef among them.
Using paper towels, squeeze out excess moisture from the sauerkraut. Divide the sauerkraut among the sandwiches, and top each with one tablespoon of Russian dressing. Add another layer of corned beef and a second slice of Swiss cheese to each sandwich. Top with the remaining bread slices; butter the side facing out.
Preheat a griddle or frying pan to medium heat. Cook the sandwiches on one side until the bread is golden brown. Use a spatula to carefully flip the sandwiches over and finish cooking on the second side. Cut the sandwiches in half before serving.
Make 4 sandwiches. 

Thursday, September 9, 2010

Charles Kirby's Famous Jalapeno Cheese Cornbread


My dear friend Charles Kirby, one of the finest character artists of the National Ballet of Canada, is equally famous in my mind for his fabulous Jalapeno Cheese Cornbread. Born in the southern US, his flair for southern cookin' comes honestly. So does his flair for entertaining. Charles believes in having a signature cocktail for any brunch, lunch, dinner or simple get-together. One memorable dinner party he held while he was living in Toronto, featured his fried chicken and cornbread, preceded by his signature cocktail for the evening — A Pink Elephant. A heady concoction of frozen pink lemonade and rum!


Off stage, Charles's timing was never his strong suit, so any meal that he created was always served an hour or so later than intended, which made cocktail "hour" a nebulous concept. It could go on for quite a while, and often did. Much later that evening, dinner was finally served. It was worth the wait. I got the cornbread recipe from Charles the next day, and have been making it ever since. It's sweet, moist on the inside, a little crispy on the outside, and the jalapenos pack a little punch. So does the Pink Elephant!


Charles' Jalapeno Cheese Cornbread


1 cup cornmeal
1/2 tsp salt
1/2 tsp baking soda
1 cup creamed corn
2 large eggs, beaten
2/3 cup buttermilk
1/3 cup shortening
1 cup sharp cheddar, grated
1/2 cup canned jalapeno peppers, chopped

Preheat oven to 350°. Put shortening in a skillet and place in oven until melted. (Alternatively you could use a muffin pan). Stir dry ingredients in a bowl. Stir wet ingredients in another bowl, except jalapenos. Combine wet and dry ingredients together, adding the jalapenos at the end. Pour the mixture into the heated skillet (or muffin pan) and bake 30-40 minutes, until puffed and golden.

Serves 6-8 as a side dish. More if you make them muffin-style.


Charles Kirby's Pink Elephant Cocktail

1 can frozen pink lemonade
1 can white rum
ice cubes

Empty the can of frozen lemonade into a blender. Top up the empty can with white rum and pour it into the blender. Then top up the blender with ice cubes and purée. Serve in decorative glasses, and garnish with a sprig of mint if you wish. Or if you remember!

Serves 4-6

Wednesday, September 8, 2010

A Harbinger of Summer - Black Bean & Corn Salad


Like the early blooming tulips that harbour the hope of warm sunny days, a favourite summer recipe can be the harbinger of summer's simple pleasures and the long languid days to come. One of my favourite recipes this summer was a yummy Black Bean and Corn Salad with avocado and cilantro. 


Fresh, festive and fabulous, the flavours burst in your mouth and will satisfy omnivores and herbivores alike! It's easy, can be made ahead of time and is good for you too. What's not to like?


Black Bean and Corn Salad

1 15.5oz. can black beans, rinsed and drained
1 8oz. can corn, rinsed and drained (or fresh shucked corn)
1 red pepper, diced
1 avocado, diced
1/4 cup red onion, diced
1 scallion, chopped
1 lime, juiced
3 tablespoons olive oil
1/4 cup cilantro
salt and pepper to taste

Combine beans, corn, red pepper, onion, scallion and cilantro in a bowl; season with salt and pepper. Mix in lime juice and olive oil. Cover with cling film and marinate in fridge for at least 30 minutes. Add avocado just before serving. 

Serves 6-8 as side dish.