Monday, November 29, 2021

Braised Oxtail with Creamy Mashed Potato


Rich, succulent and meltingly tender, Braised Oxtail must be one of the ultimate comfort foods. The magic of braising is that it relies on heat, time, and moisture to successfully break down the tough connective tissue and collagens in meat, transforming the dense, well-marbled texture of oxtail until its fall-off-the-bone tender, while creating a velvety, deeply flavoured sauce along the way. From the perfect pot roast to the fragrant complexity of a classic coq au vin, there's really no food more satisfying than a well-braised dish. Slowly braising the oxtail to succulent perfection in a combination of red wine, beef broth, flour, a bouquet of aromatic herbs and chopped vegetables gives the meat a deep, dark mahogany colour and fabulous flavour, that makes this one of my favourite dishes on a cold winter day. Rich in gelatin, the bone marrow adds a sticky, glossy texture that's impossible to beat. Served over a mound of Leek & Scallion Mashed Potatoes with a puddle of satiny sauce and a bottle of full bodied red wine, this dish is a winner.


Braised Oxtail Stew with Red Wine
Serves 4
Recipe adapted from The Silver Palate

5 lb oxtails, cut into 2-inch pieces
3/4 cup all-purpose flour
3 tbsp olive oil
3 cups beef broth
1 cup Burgundy wine
1 cup tomato juice
3 tbsp tomato paste
4 garlic cloves, finely chopped
3 bay leaves
1 tsp dried thyme
1/2 tsp grated nutmeg
1 tsp salt
1 tsp freshly ground black pepper
2 cups coarsely chopped yellow onion
1 cup diced celery
1 cup diced carrot, cut 1/8-inch thick
1/2 cup chopped parsley, for garnish

Creamy Mashed Potatoes:
4 lb yukon gold or baking potatoes, peeled and cut into quarters 
salt and pepper, to taste
2 cups whole milk or light cream 
3 tbsp butter 


Dry and dredge the oxtails with flour until thoroughly coated, shaking off the excess. Heat the oil in a large pot or dutch oven, and add to the pot one by one. Don’t overcrowd the pot, or you won’t get good colouring on the meat – do it in batches if necessary. Brown the oxtail on all sides, turning with tongs, until the meat has a nice colour. Remove from the pan and set aside on a plate. 

Add the beef broth, wine, tomato juice and paste and whisk to combine. Stir in the garlic, bay leaves, thyme, nutmeg, salt and pepper, then add the onions, celery and carrot, mixing well. Return the oxtails to the pot and immerse them well in the liquid. Bring to a boil, then cover, reduce the heat and simmer for 2 to 2 1/2 hours, or until the oxtails are very tender and just about falling away from the bone. 

Meanwhile, begin to prepare the mashed potatoes. In a large pot, bring the potatoes to a boil over medium-high heat and cook until tender, about 20 minutes. Drain well. Mash the potatoes well with a potato masher, or ricer, until smooth and free of chunks. Add the cream and butter, and season with salt and pepper. Add the chopped chives and mix well. Cover and keep warm until the oxtails are ready to be served.

Once the oxtails are cooked, discard the bay leaves and remove the oxtail with a slotted spoon and place on a warm plate. Using a hand immersion blender, purée the braising liquid until smooth, then return the oxtails to the pot, cover and rewarm over low heat. 

To serve, arrange 3-4 oxtail around the side of each dinner bowl and spoon some sauce over top, with a dollop of mashed potatoes in the middle. Garnish with chopped parsley and serve immediately.


Friday, November 26, 2021

Roasted Acorn Squash with Butter & Brown Sugar


Forget the turkey. Acorn squash halved and slathered in butter and brown sugar is Thanksgiving gold. One of the easiest squash recipes you can make, it’s a great staple side dish for fall cooking. A small winter squash named for its resemblance to a large acorn, roasting is the best cooking method for this ridged green wonder because its natural sweetness intensifies as it caramelizes, producing fabulous flavour. Rich in potassium, calcium, and vitamins A and C, acorn squash is also low in fat, cholesterol and carb free, providing one of the best possible ratios of heart-healthy vitamins to calories and yumminess.


Roasted Acorn Squash with Butter & Brown Sugar
Serves 2

1 acorn squash
2 tbsp butter
1/4 cup loosely packed brown sugar

Preheat the oven to 400°F. Slice the acorn squash into half, and using a sturdy metal spoon, scrape out the seeds and stringy bits inside each squash half, until the inside is smooth. Add a tablespoon of butter on the inside of each half and sprinkle brown sugar over the butter. Place the squash halves cut side up in a roasting pan. Pour 1/4 inch of water over the bottom of the pan so that the squash doesn't burn or get dried out in the oven. Bake at 400°F for about 1 hour, until the tops of the squash halves are nicely browned and the squash flesh is very soft and cooked through. Serve immediately. 


Wednesday, November 24, 2021

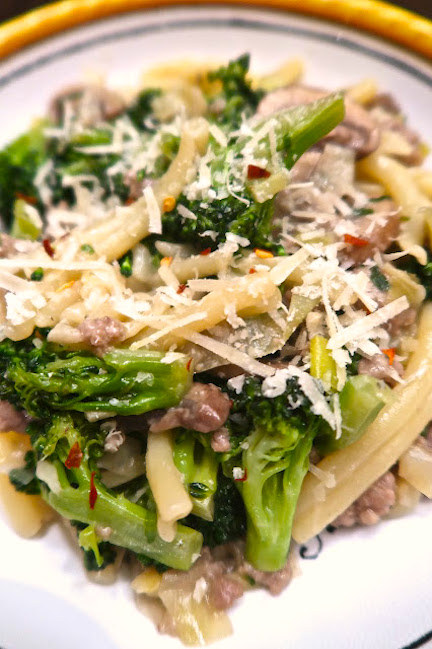
Sicilian Casarecce con Broccoli e Salsiccia


Originally from Sicily, Casarecce is a short pasta which has been loosely rolled like a scroll, quite similar to Arabian 'pasta busiata' that was made with a 'bus' or reed to curl the pasta. Also known as Maccaruna di Casa, busiate are Sicily’s most famous pasta lunga, and are perfect for soaking up sauces. The deft hands of Sicilian women traditionally turned these out with astonishing speed — knobs of dough were formed into ropes and rolled around a ferretto, similar to a knitting needle. Paired with a classic sauce of Italian sausage and broccoli, Casarecce con Broccoli e Salsiccia is a match made in culinary heaven. Simple, hearty and delicious, this sensational pasta is also excellent combined with sautéed leeks, anchovies and mushrooms for a fabulous full flavoured dish, the ideal comfort food for a chilly Autumn evening.


Casarecce with Italian Sausage, Broccoli, Leeks & Cremini Mushrooms
Serves 4

1 lb casarecce pasta
2 tbsp extra virgin olive oil, divided
1/2 lb sweet Italian sausage, removed from casings
4 anchovies
2 garlic cloves, minced
1/4 cup dry white wine
1/2 lb broccoli florets
8 oz cremini mushrooms, cleaned, trimmed and sliced
1 small leek, trimmed, cut in half length-wise and finely slice 
1 tbsp finely chopped tarragon
1/4 tsp salt
1/8 tsp red pepper flakes
1 tbsp unsalted butter
1 cup freshly grated Pecorino 


Bring a large pot of salted water to a boil. Add the casarecce and cook according to package instructions. Meanwhile, in a large frying pan, heat 1 tablespoon of the olive oil over medium high heat. Crumble the sausage and anchovies into the skillet and cook, breaking apart with a spoon, until lightly browned, 5-6 minutes. Using a slotted spoon, remove the sausage from the pan and set aside in a small bowl. Add the mushrooms to the same pan, season with salt and pepper, and cook 5 minutes until they start to brown. Reduce the heat to medium and add the remaining olive oil, garlic and chopped leeks and cook until soft, about 5 minutes.

Then add the broccoli florets and red pepper flakes, and sauté for 2 minutes, then add the sausage and mushrooms to the pan along with the wine. Cook, stirring frequently, until the broccoli is tender-crisp and the sauce is warmed through, about 5-6 minutes. Stir in the butter until melted and simmer for a few minutes to reduce and concentrate the sauce.

Drain the pasta well and add to the sausage and broccoli mixture, tossing well to blend. Stir in half of the grated cheese taste and chopped tarragon, and adjust the seasoning to taste. Transfer the pasta to a serving platter or individual bowls, sprinkle with a little extra grated cheese, and place the remainder in a small bowl for guests to help themselves.


Monday, November 22, 2021

Split Pea & Ham Hock Soup: A Winter Warmer


Hearty, warm and delicious, Split Pea & Ham Hock Soup is the perfect dish for a chilly winter night. Made with dried split peas and infused with an intensely flavourful, smokey and meaty ham hock, this comforting and soul-satisfying soup can also be made as a 'day-after' soup, prepared with the bone and trimmings from a sweet and smoky Sunday roasted ham. For those of us who generally cook for two, it's just as convenient to buy a ham hock, but be sure to get your butcher to cut in half, as it will be easier to simmer in the soup later. They may look like a tough cut, but when cooked slowly, they release a wonderful smoky flavour that is undeniably delicious, and give the broth great flavour. Made with a short list of ingredients, this recipe is great for lunch or dinner, freezes well, and like many hearty soups or stews, even tastes even better the following day.


Split Yellow Pea Soup with Ham Hock
Serves 
6

1/4 cup olive oil
1 large onion, finely diced
2 celery stalks, finely diced
2 carrots, finely diced
2 1/2 cups split green peas
1 1/2 lb smoked ham hock
8 cups chicken stock 
4 sprigs fresh thyme
3 bay leaves
Salt and freshly ground black pepper

Garnish:
1 cup sour cream, crème fraiche or greek yoghurt
6 sprigs fresh parsley

In a large saucepan, sauté the onion, celery and carrots over medium-high heat for about 5 minutes, until the onion is softened but not browned. Add the peas, ham hock, thyme and bay leaves and cover with stock. Bring to a boil, then reduce the heat and cook gently for one hour. 

After the stock has cooked trough, discard the thyme and bay leaves, but reserve the ham hoc in a large bowl. Meanwhile, process the soup in a blender or food processor, and pulse until smooth, then return to a clean pan — I like to use a hand immersion blender so the soup can be made in one pot. Once the ham hock has cooled, pull the meat off the bone and shred into small pieces. Add the ham to the soup and heat through gently, seasoning to taste with salt and pepper.

To serve, garnish with dollop of sour cream, crème fraiche or greek yoghurt, and finish with a sprig of fresh parsley.


Friday, November 19, 2021

Grilled Lamb & Beef Kefta with Tahini & Pomegranates


Kefta is traditionally a meat mixture, often of beef or lamb, mixed with savoury spices like cumin, paprika, and even a bit of cinnamon for some warmth. There are hundreds of varieties of meatballs – kofta in Arabic and ktsitsot in Hebrew – each with its own unique heritage and specific preparation technique. You can form them into round meatballs, flat patties, thin fingers or more commonly, into torpedo-shaped kebabs that are perfect for wrapping up inside of a pita or serving with any kind of warm flatbread. In this Moroccan-inspired version, the ground beef and lamb are seasoned with a combination of spices, finely chopped onion and fresh herbs. Although some recipes suggest adding breadcrumbs or eggs to bind the mixture, it's not wholly traditional. Chilled for an hour or so before cooking, the kefta are grilled for 10-15 minutes over medium heat until just they're cooked through and beautifully golden brown. Served with flatbread or with quinoa, couscous or crunchy cucumber and tomato salad and a heaping bowl of tzatziki, Kefta are healthy, delicious and bursting with flavour.


Moroccan Grilled Lamb & Beef Kefta with Tahini Sauce & Pomegranate
Serves 6

2 lb ground minced lamb and beef
1 cup loosely packed chopped cilantro
1 tbsp chopped fresh mint
1 tbsp sweet paprika
2 tsp ground cumin
2 tsp ground cinnamon
1/2 tsp ground nutmeg
1/2 tsp ground allspice
1 tbsp salt
1 cup finely chopped onion
3 garlic cloves, minced
1 tbsp Harissa paste
1/3 cup pine nuts

Tahini Sauce:
2/3 cup light tahini paste
3 tbsp lemon juice
1 medium clove of garlic, crushed
1/4 tsp salt

Garnish:
2 tbsp unsalted butter or ghee, melted- optional
1 cup pomegranate seeds 
1 tbsp each of cilantro and pine nuts


Put all the kofta ingredients in a bowl and using your hands, mix everything together well. Shape into long, torpedo-like fingers, about 3-inches long and about 2 1/4 oz each, making sure to press the mixture together to ensure the kofta are tight and keep their shape. Arrange on a plate, cover with cling film and chill until you're ready to cook them, up to one day ahead.

For the sauce, whisk together the tahini paste, lemon juice, minced garlic, 1/4 teaspoon of salt and 1/2 cup of water in a medium sized bowl. The sauce should be a bit runnier than honey, so add one or two tablespoons of extra water if needed, then cover and set aside.

To barbecue outdoors, preheat the grill to medium and cook the kefta for about 12-15 minutes, or until nicely browned all over but still lovely and juicy on the inside. If you like your meat more well done, continue cooking on the grill until your preferred level of doneness. 

To cook indoors, preheat oven to 425°F. Heat 2 tablespoons of sunflower oil in a large non stick frying-pan and sear the kefta in batches over high heat, making sure they're not bunched together. Sear them on all sides until golden brown, about 6-10 minutes for each batch for medium-rare. For medium or well-done, place the kefta on a baking tray and cook in the oven for another 2-4 minutes.

To finish, melt the ghee in a small saucepan and allow to brown a little, taking care that it doesn’t burn. Spoon the butter over the kofta as soon as they come out of the oven, or baste on the grill as the kefta are cooking. 

To serve, arrange the kefta on warmed platter and drizzle with some of the Tahini Sauce, a sprinkle of fresh pomegranate seeds and garnish with extra cilantro and pine nuts. Serve at once with any remaining sauce on the side.


Wednesday, November 17, 2021

Grilled Black Tiger Shrimp with Chopped Scallions


Considered to be the "Queen of Prawns", Black Tiger Shrimp have a natural sweet flavour and moist meaty texture that when butterflied and grilled on an outdoor barbecue become a voluptuous mountain of decapodal decadence. An excellent source of protein and several important vitamins and minerals including Niacin, Iron, Phosphorus and Zinc, tiger shrimp are also low in calories and absolutely carb-free. Although high in cholesterol, these tasty morsels contain heart-healthy omega-3 fatty acids which help lower blood pressure and help prevent coronary heart disease — so there's no reason not to dig in and enjoy Neptune's bounty.


Black Tiger Shrimp with Chopped Scallions
Serves 6

18 Black Tiger Shrimp, peeled, deveined and butterflied with tails left on
2 tbsp sesame oil
1 tbsp olive oil
2 scallions, finely chopped on a diagonal, for garnish


Place the butterflied shrimp in a large bowl and toss with a little sesame and olive oil to lightly coat. Cover and refrigerate for up to 6 hours. Preheat the barbecue to medium high and cook the shrimp for about 5 minutes per side then a minute more standing up on their ends. To serve, arrange the shrimp on a large platter and garnish with chopped scallions. 


Monday, November 15, 2021

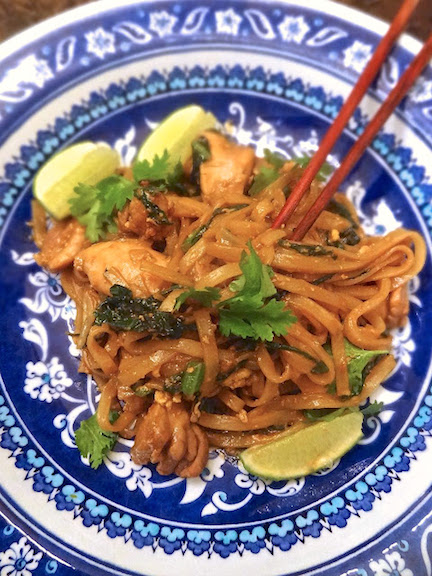
Stir Fried Soy Sauce Noodles with Chicken & Gai Lan


Pad See Ew, also known as Stir Fried Soy Sauce Noodles, is a Chinese-influenced noodle dish, and one of the most popular street foods in Thailand. The soft and chewy rice noodles are traditionally pan fried with chicken, beef or pork, Chinese broccoli — known as Gai Lan — scrambled egg and dark soy sauce. Inspired by a mouthwatering recipe from renowned Australian chef David Thompson, widely recognised as an authority on Thai food and culture, his celebrated cookbook 'Thai Food' is a comprehensive account of this ancient and exotic cuisine and features all of the classic, well-loved recipes as well as hundreds of lesser known but equally authentic and delicious Thai dishes that have been handed down from generation to generation, such as the sensational Pad See Ew. Quick, easy and delicious, the dish takes less than 5 minutes to cook, and captures the essence of one of Thailand's ultimate comfort foods.


Gai Pad See Ew - Stir Fried Soy Sauce Noodles with Chicken
Serves 2

Sauce:
2 tbsp dark soy sauce or 'ketjap manis', an Indonesian sweet soy sauce
2 tbsp oyster sauce
2 tsp soy sauce 
2 tsp white vinegar
2 tsp palm or brown sugar
2 tbsp water

Stir Fry:
6 oz wide flat Thai rice stick noodles
2 tbsp vegetable oil
4 cloves garlic cloves, minced
12 oz skinless boneless chicken thighs, cut into bite size pieces
1 large egg
4 cups Chinese broccoli, also known as Gai Lan 
Pinch of fresh ground white pepper 
Handful of bean sprouts
Fresh cilantro for garnish


Soak the rice noodles in cold water for 1-2 hours, then drain. Meanwhile, combine the sauce ingredients in a small bowl and set aside. Rinse the gai lan and trim 1-inch from the end of each stalk and discard. Separate the leaves from the stems and reserve both. Chop the leaves into 1-inch pieces, then slice the stems vertically into thin 1-inch long strips. Mince the garlic straight into a wok or large pot with the oil and place on high heat. When the oil is hot and the garlic begins to colour, add the chicken and continue to fry until the chicken is almost cooked. Add the noodles and gai lan stalks and once they are cooked, about 4 minutes, crack in the egg and stir fry to scramble. Add the sauce and leaves, folding gently to combine, and stir continuously until everything is well combined. The sauce should coat the noodles evenly and become lightly caramelized. The dish should be served immediately sprinkled with fresh ground white pepper and garnished with bean sprouts and fresh cilantro.


Friday, November 12, 2021

Crème Caramel: Rich, Smooth & Decadently Delicious


A true French classic, Crème Caramel is undoubtedly one of my favourite desserts. Rich, smooth and decadently delicious, this delightful creamy custard was my 'sweet' of choice growing up in England. Since then, Crème Caramel has taken on magical proportions — anything so outrageously delicious must be impossible to make. Au contraire, or so I discovered a few years ago when I decided to tackle the time-honoured egg-rich über-pud from the Bouchon cookbook by Thomas Keller.

Keller's recipe is surprisingly easy to prepare and calls for cooking the Crème Caramel in individual ramekins, making for easy, manageable and elegant single servings. All you need are four ingredients: milk, eggs, sugar and vanilla. The first step is melting the sugar quickly on the stovetop until it thickens to a rich amber caramel, then pouring it quickly into each of the ramekins. For the custard, warm milk, sugar, vanilla, and eggs are whisked together then poured overtop. 

To ensure that the Crème Caramel bakes slowly and evenly, the custards are set in a hot water bath and cooked for 1 hour at 300°F. Once removed from the oven, the custards are then cooled to room temperature, and served at once, using a small knife to loosen the custard. The ramekins are then inverted, releasing the rich sweet caramel that nestles in a glorious amber puddle around each wobbly pud. Heaven. In his Bouchon cookbook, Keller calls this caramel covered custard, the pinnacle of all bistro desserts, and I agree. 


Crème Caramel
Serves 8
Recipe courtesy of Thomas Keller / Bouchon 

Caramel:
1/2 cup plus 1 tbsp sugar
3 tbsp light corn syrup
3 tbsp water

Custard:
4 cups whole milk
1 1/4 cups plus 3 tbsp sugar
5 large eggs
3 large egg yolks
2 1/4 tsp pure vanilla extract


To make the caramel: In a small saucepan, bring the sugar, corn syrup and water to a simmer over moderate heat, stirring lightly to dissolve the sugar. Simmer until a rich, amber caramel forms, about 25 minutes. Wash down any sugar crystals from the side of the pan with a wet pastry brush. Pour an equal amount of hot caramel into each ramekin; if the caramel gets too hard, gently reheat it.

To make the custard: Arrange eight 1-cup ramekins in a large roasting pan, and preheat the oven to 300°F. In a large saucepan, bring the milk and sugar just to a simmer over moderate heat, stirring to dissolve the sugar, about 5 minutes. Let cool until warm. In a large bowl, thoroughly whisk the eggs with the yolks. Slowly whisk in the warm milk mixture and then the vanilla.

Strain the custard and pour it into the prepared ramekins. Add enough hot water to the roasting pan to reach halfway up the sides of the ramekins. Bake the custards for about 1 hour, or until they are set but still slightly jiggly in the centre. Remove the hot custards from the water bath and let them cool on a rack to room temperature, then serve immediately or cover and refrigerate the custards overnight.

To serve, run a thin knife around the edge of the ramekin to loosen the custard. Invert the crème caramel onto a plate. Repeat with the remaining crème caramels and serve.


Wednesday, November 10, 2021

Lemon & Ricotta Pancakes with Fresh Blueberries


Light, luscious and delightfully decadent, Lemon Ricotta Pancakes are guaranteed to make any pancake lover swoon with delight. Light as air and delicately flavoured with plump fresh blueberries, lemon zest and just a hint of vanilla, these are perfect little pancakes. Crispy on the outside and delicately creamy on the inside with little melted pockets of fresh ricotta, they are absolutely delicious with a dusting of powdered sugar, a dollop of yoghurt or drizzle of maple syrup, for the ultimate decadent Sunday brunch.


Lemon Ricotta Pancakes
Serves 6
Recipe courtesy of The Original Dish

2 1/2 cups all-purpose flour
1/2 cup brown sugar
2 tbsp + 1 tsp baking powder
1 tsp salt
4 large eggs
10 oz whole milk ricotta cheese
2 cups milk
1 tbsp lemon juice
2 tsp lemon zest
2 tsp vanilla extract
butter, to cook
maple syrup
powdered sugar
12 oz fresh blueberries


Whisk the flour, brown sugar, baking powder, and salt together in a large bowl until incorporated. In a separate bowl, beat the eggs. Add in the ricotta cheese and whisk until smooth. Add the milk, lemon juice, lemon zest, and vanilla to the egg mixture. Whisk to combine. Slowly pour the wet ingredients into the flour mixture, whisking until the flour soaks up the liquid and the mixture is well combined. Heat a non-stick frying pan over medium heat. 

Working in batches, add a tablespoon of butter at a time to the pan and let melt. Ladle the pancake batter onto the surface, creating your desired size pancake and lay 6-8 blueberries on top. Cook the pancake on one side until golden brown and bubbles begin to form on the top, then using a spatula, flip the pancake over and finish cooking on the other side. Keep the pancakes warm in the oven as you finish cooking all the batter. 

Serve the pancakes garnished with some extra blueberries, a sprig of fresh mint, a sprinkle of powdered sugar and a generous drizzle of top quality Canadian maple syrup to finish. 


Monday, November 8, 2021

Thai King Prawn Curry in Spicy Coconut Milk


King prawns in a rich red curry sauce with coconut milk, Chu Chi Goong is one of the most well loved curries in northern Thailand. Although large tiger prawns are typically used, a combination of jumbo shrimp and scallops are also excellent. Inspired by a recipe from The Young Thailand Cookbook by Wandee Young and Byron Ayanoglu, I also added sliced bamboo shoots, water chestnuts and bright green peas for added colour and texture. Garnished with finely sliced Kaffir lime leaves, sweet red pepper, fresh basil and served with fragrant Jasmin rice, this luscious curry is full flavoured with just enough heat to make it interesting.  


Thai King Prawn Curry in Spicy Coconut Milk
Serves 2-4
Adapted from The Young Thailand Cookbook

6 lime leaves
4 cups unsweetened coconut milk
4 tbsp red curry paste
1 tbsp sugar
1 tsp fish sauce
15 large shrimp, shelled and deveined
1/2 cup bamboo shoot strips, thinly sliced
1/2 cup water chestnuts, thinly sliced
1/4 cup green peas, frozen
2 1/2 cups steamed Jasmin rice

Garnish:
15 whole fresh Thai basil leaves
1 small red pepper, thinly sliced


Slice the lime leaves as thinly as possible — thread-like is best — and reserve. Heat 2 cups of the coconut milk in a large saucepan on high heat until it comes to a boil. Turn the heat down to medium, add the red curry paste and stir to dissolve, cooking for 1-2 minutes until the oil of the coconut milk rises to the surface. Add the sugar, bamboo shoots, water chestnuts and half of the reserved lime leaf. Stir-fry for 30 seconds, then add the fish sauce and final 2 cups of coconut milk. Turn the heat up to maximum and stir-cook for 1 minute. Add the shrimp and green peas, and stir into the sauce. Cook for 2-3 minutes, stirring occasionally, until the shrimp have just turned opaque and the oil of the coconut milk has once again risen to the surface. Remove from the heat, and transfer to a warm serving dish and garnish with the remaining lime leaves, basil and strips of red pepper. Serve immediately with steamed Jasmin rice.


Friday, November 5, 2021

Cauliflower Cheese with Luscious Cheddar Béchamel


Luscious, creamy, cheesy and delicious, there's nothing like a whole cauliflower, smothered and baked in a béchamel sauce, enriched with aged cheddar cheese and a spoonful of english mustard. It's classic comfort food, and as midweek suppers go, Cauliflower Cheese is a thrifty and nutritious triumph. An excellent cheese sauce is unquestionably the most important element of any cauliflower cheese, but when combined with a reliable creamy béchamel, this dish goes from satisfying to sensational, and a dish that can be served as a side dish with a Sunday roast, or a sinfully decadent treat all on its own with a big spoon to scoop up every last bit of lovely cheesy sauce.


Cauliflower Gratin with Cheddar Béchamel Sauce
Serves 2-4

1 head cauliflower, broken into large florets
2 tbsp butter
2 tbsp plain flour
1 cup partly skimmed or whole milk, as required
1 tsp English mustard
2 cups grated mature cheddar cheese
salt and freshly ground black pepper


Preheat the oven to 375°F. Break the cauliflower into large florets and place in a steamer basket over boiling water for 10-15 minutes until fork tender, then remove from the heated set aside. To make the sauce, melt the butter in a medium saucepan then stir in the flour and cook over a gentle heat for one minute. Remove the pan from the heat and gradually add the milk as required, a little at a time, stirring well with a wooden spoon between each addition. Return the pan to a medium heat and bring the mixture to the boil, stirring constantly. Simmer the roux for two minutes until thick, then remove the from the heat. Stir in the mustard and grated cheese until melted and set aside. Arrange the cauliflower florets heads-up in and ovenproof baking dish. Carefully pour over the béchamel cheese sauce ensuring the cauliflower is completely covered. Bake for 25-30 minutes, or until the top is golden-brown and bubbling.


Wednesday, November 3, 2021

Moroccan Grilled Beef Kefta with Tahini Sauce


Kefta is traditionally a savoury meat mixture, often of beef or lamb, mixed with fragrant spices of cumin, paprika, and even a bit of cinnamon for some warmth. There are hundreds of varieties of meatballs – kofta in Arabic and ktsitsot in Hebrew – each with its own unique heritage and specific preparation. They can form into round meatballs, flat patties, thin fingers or more commonly into torpedo-shaped kebabs that are perfect for wrapping up inside of a pita or serving with any kind of warm flatbread. In this Moroccan-inspired version, the ground beef is seasoned with a combination of spices, finely chopped onion and fresh herbs. Although some recipes suggest adding breadcrumbs or eggs to bind the mixture, it's not wholly traditional. Chilled for an hour or so before cooking, the kofta can be grilled outdoors for 10-15 minutes over medium heat until just they're cooked through and beautifully golden brown, or sautéed in a frying pan on cooler evenings. Served with flatbread or with quinoa, couscous or crunchy cucumber and tomato salad plus a heaping bowl of tzatziki or cumin-yogurt sauce, Kefta are healthy, delicious and absolutely bursting with flavour.


Moroccan Grilled Beef Kefta with Tahini Sauce & Pomegranate
Serves 4

2 lb ground minced lamb and beef
1 cup loosely packed chopped cilantro
1 tbsp chopped fresh mint
1 tbsp sweet paprika
2 tsp ground cumin
2 tsp ground cinnamon
1/2 tsp ground nutmeg
1/2 tsp ground allspice
1 tbsp salt
1 cup finely chopped onion
3 garlic cloves, minced
1 tbsp Harissa paste
1/3 cup pine nuts

Tahini Sauce:
2/3 cup light tahini paste
3 tbsp lemon juice
1 medium clove of garlic, crushed
1/4 tsp salt

Garnish:
2 tbsp unsalted butter or ghee - optional
1 cup pomegranate seeds 
1 tbsp each of cilantro and pine nuts


Put all the kefta ingredients in a bowl and using your hands, mix everything together well. Shape into long, torpedo-like fingers, about 3-inches long and about 2 1/4 oz each, making sure to press the mixture together to ensure the kofta are tight and keep their shape. Arrange on a plate, cover with cling film and chill until you're ready to cook them, up to one day ahead.

For the sauce, whisk together the tahini paste, lemon juice, minced garlic, 1/4 teaspoon of salt and 1/2 cup of water in a medium sized bowl. The sauce should be a bit runnier than honey, so add one or two tablespoons of extra water if needed, then cover and set aside.

To barbecue outdoors, preheat the grill to medium and cook the kefta for about 12-15 minutes, or until nicely browned all over but still lovely and juicy on the inside. If you like your meat more well done, continue cooking on the grill until your preferred level of doneness. 

To cook indoors, preheat oven to 425°F. Heat 2 tablespoons of sunflower oil in a large non stick frying-pan and sear the kefta in batches over high heat, making sure they're not bunched together. Sear them on all sides until golden brown, about 6-10 minutes for each batch for medium-rare. For medium or well-done, place the kefta on a baking tray and cook in the oven for another 2-4 minutes.

To finish, melt the ghee in a small saucepan and allow to brown a little, taking care that it doesn’t burn. Spoon the butter over the kofta as soon as they come out of the oven, or baste on the grill as the kefta are cooking. 

To serve, arrange the kefta on warm platter and drizzle with some of the Tahini Sauce, a sprinkle of fresh pomegranate seeds and garnish with extra cilantro and pine nuts. Serve while hot with any remaining sauce on the side.


Monday, November 1, 2021

Patria: Classic Spanish Cuisine on King West


Seafood is a staple of Spanish cuisine, and Patria on King Street West showcases an ever-changing selection of only the freshest fish, octopus and shrimp, sourced daily. The extensive menu also features authentic Spanish dishes such as delicately prepared crispy Croquetas de Setas made with porcini mushrooms, manchego cheese and truffle aioli and imported jamón ibérico, from Spain’s highly-prized acorn-fed black-hoofed pigs right through to traditional Paellas by Australian chef Stuart Cameron. The stylish interior features high ceilings, exposed brickwork and a spectacular mixed media two-story mural of a flamenco dancer, mounted behind a hand stitched screen by Canadian artist Laura Carwardine. Another King West restaurant collaboration by dining and nightlife impresarios Charles Khabouth and Hanif Harji, this one serving Spanish food, Patria opened in October 2012 offering a taste of regional Spain. 

Arriving for dinner on a Thursday evening, the restaurant was absolutely full, with tables being occupied as soon as they were vacated. It was the first night Patria was open to full capacity, and boy, the place was humming. With ever guest required to show proof of vaccination and ID, and every server wearing masks, it nevertheless felt like life was sliding back to normal. With his natural warmth and good humour, our server Brent was thrilled to be back working full time and made our evening even more special. 

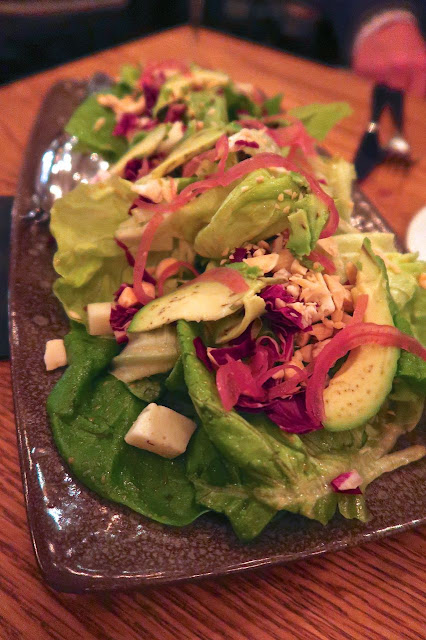
Beginning with a glass or two of Cava and bowl of Marcona almonds, we began to sample the menu starting with a plate of acorn fed Iberian Chorizo de Bellota followed by a wonderful Ensalada de Aguacate with butter lettuce, avocado, marinated red onion, goat cheese, quince dressing and Marcona almonds. The Croquetas de Setas with porcini mushrooms, Manchego cheese and truffle aioli melted in our mouth, and the Sautéed Wild Shrimp with garlic and parsley sauce sweet were sweet and delicious. With an enviable wine list with with a hit list of Spanish greats, we ordered an elegant Hacienda de Arinzano Tempranillo from from Navarra, which we enjoyed with the Paella Patria that featured Argentinian shrimp, PEI mussels, fish, peas, clams and saffron. Finishing with a slice of Basque Cheesecake and glass of Amontillado, a dry Spanish sherry, our evening at Patria marked the first night it felt good to be out on the town.


The interior of Patria

Hand stitched screen on Patria's feature wall by Canadian Laura Carwardine

Parés Baltà's Brut cava

Almendras Saladas: salted Marcona almonds

Aceitunas: house marinated olives

Carving black hoof 36 month aged acorn-fed Ibérico de Bellota

Plate of acorn fed Iberian Chorizo de Bellota

Chef Stuart Cameron

Ensalada de Aguacate with butter lettuce, avocado, marinated red onion, goat cheese, 
quince dressing and marcona almonds

Garnishing a dish in the pass-thru

Croquetas de Setas with porcini mushrooms, Manchego cheese and truffle aioli

Sautéed wild shrimp with garlic and parsley sauce

Hacienda de Arinzano Tempranillo 2017

Paella Patria with Argentinian shrimp, PEI mussels, fish, peas, clams and saffron

Basque Cheesecake with caramelized Ontario peaches with a peach reduction

Lustau 'Los Arcos' Amontillado


Patria Seafood Paella
Serves 4
Recipe courtesy of chef Stuart Cameron

Sofrito:
1 1/2 tbsp olive oil
1/2 white onion, finely diced
1 small garlic clove, thinly sliced
1 bay leaf
1 generous pinch salt
1 red pepper, finely diced
1 ripe tomato, peeled, seeded and diced

Paella:
2-3 generous pinches kosher salt and pepper
6 large shrimp, shelled and deveined
6 oz monkfish, cut into 3 pieces
2 large langoustines, cut in half lengthwise
1/4 cup extra-virgin olive oil
2 cleaned squid, cut into 6 pieces
1 large garlic clove, finely sliced
3 bay leaves
1 cup bomba rice
1 tsp smoked paprika
2 small pinches saffron, crumbled
1/2 cup dry white wine
3 1/2 cups fish stock
12 fresh mussels, scrubbed
1 small handful snap peas, blanched and torn in half lengthwise


To prepare sofrito, heat the oil in a large saucepan over medium-low. Add the onion, garlic, bay leaf and salt. Cook for 10 to 15 minutes until the onion is soft and translucent. Add the red pepper and cook, stirring occasionally, for 20 to 30 minutes until soft. Add the tomato and cook for 45 minutes to 1 hour until the mixture is as thick as jam. Stir occasionally.

Season the seafood, except the squid and mussels, with salt and pepper. Heat oil in a paella pan over medium-high. When the oil is shimmering, add the shrimp and monkfish. Cook for 30 seconds to 1 minute until the shrimp is pink and fish is lightly browned on one side. Transfer to a plate. Add the langoustines and squid to the pan, and cook for 1 minute until partially cooked. Add to a plate along with the shrimp and fish and set aside until ready to use. Remove the pan from heat and let cool slightly.

Set the pan over medium heat. Add the garlic, then 1/4 cup of sofrito and bay leaves. Cook for 2 minutes. Add the rice to pan. Cook, stirring occasionally, for 1 to 2 minutes. Add paprika and saffron. Cook, stirring occasionally, until the rice sizzles. Deglaze the pan with wine. Pour in fish stock and bring to a boil over high heat. Add the mussels and cook for 1 to 2 minutes until they open. Set the mussels aside until ready to use. Discard any mussels that do not open.

Reduce the heat to low. Simmer for 15 minutes until the rice is almost tender. Place the seafood, uncooked sides down, over the rice, and increase the heat to medium-high. Cook for about 5 minutes until the seafood is cooked through and a crust forms on the bottom of pan. Turn off the heat. Scatter blanched snap peas and parsley overtop, and let rest for 5 minutes before serving.