Monday, August 30, 2021

Cauliflower Mash: A Guilt-Free Silky Smooth Purée


This fabulous guilt-free recipe from the South Beach Diet Cookbook is my 'go-to' resource when trying to shed a few unwanted pounds. Wonderfully flavourful in it's own right, Cauliflower Mash is absolutely delicious as a silky smooth purée, perfect with grilled steak, nestled under pan-seared scallops, or served with any kind of fresh grilled fish or seafood.


Cauliflower Mash
Serves 2

3 cups cauliflower florets
1 tbsp butter
2 tbsp whole milk or light cream
pinch of salt and freshly ground black or white pepper
Fresh chives, finely chopped for garnish


Steam the cauliflower until very soft then purée in a food processor. Transfer the mash into a medium saucepan and add the butter and milk to taste. Season with salt and pepper, then cover and keep warm over low heat until needed.


Friday, August 27, 2021

Gobi Matar: Carb-Free Indian Cauliflower & Peas


A classic Punjabi dish, Aloo Gobi, or cauliflower with potatoes and peas, is a simple and delicious southern Indian vegetarian curry, shining through with rich textures, complex flavours and intoxicating aromas. A staple in most Indian restaurants, Aloo Gobi can also be adapted without potatoes for a sensational Gobi Matar, an equally delicious yet low-fat carb-free version of the original.


Gobi Matar 
Serves 2 

1/3 cauliflower 
2 tbsp vegetable oil 
1/8 tsp asafoetida 
2 tsp black mustard seeds 
12-16 kari leaves 
1/2 cup peas, fresh or frozen 
1/4 tsp turmeric 
1/8 tsp salt, or to taste 


Separate the cauliflower into small florets. Warm the vegetable oil in a large sauté pan over medium heat. When hot, add the asafoetida, then a second later, add the mustard seeds. When the mustard seeds begin to pop, add the kari leaves and stir to combine. Then add the cauliflower, turmeric and some salt to taste. Cook for 5 or 6 minutes, stirring occasionally to ensure the cauliflower is well coated with the spices and begins to brown slightly. Add 1/4 cup of water, and as soon as it starts to bubble, add the peas, cover the pan and turn down the heat to medium-low. Cook 10-15 minutes more until the cauliflower is soft and cooked through. Serve immediately.


Wednesday, August 25, 2021

Eggplant Parmigiana with Spinach and Ricotta


A southern Italian classic, Eggplant Parmigiana is a pasta-free vegetarian lasagna, made with thin slices of eggplant instead of pasta, layered with tomatoes, fresh basil, spinach and plenty of molten mozzarella, ricotta and parmesan cheese. With its layers of sweetly acidic tomato sauce, grilled-until-collapsing aubergine and generous amounts of oozing, stringy cheese, Parmigiana di Melanzane is comfort food at its finest. 


Baked at 375°F for about 30 minutes until bubbly and golden brown


Parmigiana di Melanzane with Spinach and Ricotta
Serves 4-6
Recipe courtesy of Thomasina Miers, The Guardian UK

For the sauce:
2 lb ripe tomatoes, or use tinned
2 red onions, peeled and quartered
4 garlic cloves, peeled
3 tbsp good olive oil 
1 tsp soft brown sugar, or to taste
1 large bunch basil, leaves picked

For the filling:
1 lb large leaf spinach
Extra-virgin olive oil
1/2 lb/250g ricotta
1/2 tsp nutmeg
3 oz parmesan, finely grated
Salt and pepper
3 large aubergines
1/2 lb/250g mozzarella


Wash and shake the spinach of any excess water. Heat a large pan, add a tablespoon of olive oil and the leaves, and cook, stirring, for a few minutes, until they have mostly collapsed. Tip into a bowl, stir in the ricotta, nutmeg and 2/3 of the parmesan, season generously, then set aside.

To make the sauce, blitz the tomatoes, onion and garlic in a food processor for a minute. Pour three tablespoons of oil into the same pan in which you wilted the leaves, and set over a medium-high heat. Add the puréed tomato mix, cook on a high heat for a few minutes, then turn the heat down low. Stir in the sugar, season generously and leave to simmer gently, stirring occasionally, for at least 15-20 minutes, and the longer, the better. After the sauce has been cooking for 10 minutes, shred all but a handful of the basil leaves and stir them in; reserve the remaining whole leaves to garnish.

Meanwhile, heat a grill to its highest setting, or a large frying pan. Cut the aubergines lengthways into roughly 1/4-inch thick slices. Don’t worry if they’re not uniform, because the slices will be covered in the silky tomato sauce later. Brush both sides with olive oil and grill or griddle for 5-6 minutes a side, until well browned and extremely soft to the point of a knife – raw, pale aubergine is never a good thing.

Heat the oven to 375°F. Taste the tomato sauce and adjust the seasoning with salt, pepper and sugar, as necessary. Spread a thin layer of sauce over the bottom of a medium-sized baking dish, and top first with a layer of the aubergine slices, followed by a layer of the spinach and ricotta mix. Shred a quarter of the mozzarella over the spinach layer, season lightly, then repeat with one or two more layers of each, depending on the size of your dish. Top with a final layer of tomato sauce. Scatter over the last of the mozzarella, parmesan and the reserved basil leaves, then drizzle with a little olive oil and bake for 30-35 minutes, until golden. Remove and leave to rest for five to 10 minutes before serving.


Monday, August 23, 2021

Zucchini & Tomato Tian with Thyme and Parmesan


A classic French Provençal dish of baked seasonal vegetables, this Zucchini and Tomato Tian with fresh thyme, captures all of the colourful flavours of summer. Simple and delicious, this dish is also low in calories. Traditionally, a summer vegetable tian can feature any variety of layered vegetables, herbs and cheeses from bright green and yellow zucchini and small potatoes to plump purple eggplant and plum tomatoes. Layered and baked, this recipe showcases summer's best — fresh zucchini, tomatoes and fresh thyme from our garden. Topped with a little grated Pecorino, this decorative gratin-style tian is one of my favourite summer recipes, and is as healthy and delicious as it looks.


Baked at 400°F for 40 minutes


Zucchini and Tomato Tian
Serves 2

3 tsp olive oil
1/2 tsp dried thyme
1/2 tsp salt
1/4 tsp fresh ground black pepper
1 large zucchini, thinly sliced
2 plum tomatoes, thinly sliced
1/4 cup fresh Parmesan, Asiago, Feta or Gruyere, grated
1 tbsp fresh thyme, plus 4 sprigs for garnish 


Heat the oven to 400°F. Brush a small baking dish with 1 teaspoon of the oil. Arrange the sliced zucchini and tomato in an alternating pattern, in the dish and season with slat and fresh black or white pepper, with a sprinkle of fresh thyme. Drizzle the composed tian with a drizzle of olive oil, and sprinkle with the grated cheese. Scatter the fresh sprigs of thyme over the tian and bake until the vegetable are tender and the cheese has melted, about 40 minutes. Serve warm.


Friday, August 20, 2021

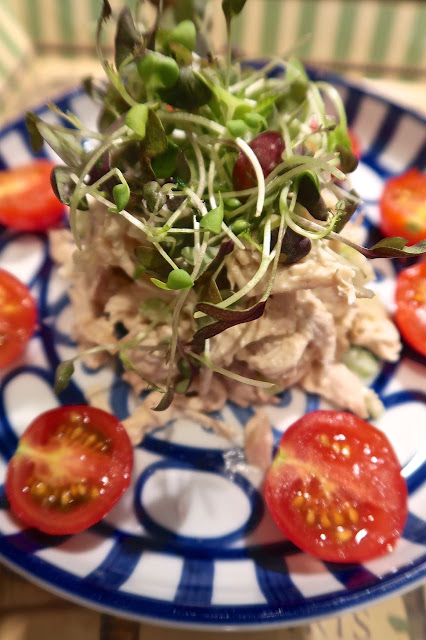
Chicken Salad with Asian Mustard Greens & Tomato


Quick, easy and delicious, Chicken Salad made using a store-bought rotisserie chicken can become a versatile base for tasty sandwiches, carb-free salads, veggie-packed grain bowls, pastas, crêpes and much more. Trimming the chicken of all excess fat and skin makes it a healthier alternative, reducing the associated saturated fat and harmful cholesterol. Once trimmed, the chicken can be torn into bite size pieces, then simply tossed with some chopped celery, a dollop of mayonnaise, Dijon mustard and seasoned with a little pepper. Topped with fresh sprouts and chopped tomato, this healthy carb free salad is perfect for a light dinner or alfresco lunch.


Chicken Salad with Asian Mustard Greens & Tomato
Serves 6

1 rotisserie chicken, trimmed of skin and fat
4 ribs celery
1/4 cup mayonnaise
1 tbsp Dijon mustard
Maldon salt and fresh cracked white or black pepper
1 package Spicy Mustard Medley, such as Good Leaf 
12 cherry tomatoes, cut in half


Trim the chicken of all the skin and excess fat, then tear into bite size pieces and set aside in a large bowl. Finely dice the celery and add to the chicken. Mix in the mayonnaise, mustard and mix well to combine. Taste, then season as desired.
To serve, spoon about a cup of the chicken salad onto each plate and top with Asian mustard greens or alfalfa sprouts, and garnish with sliced tomatoes.


Wednesday, August 18, 2021

Soft and Chewy Oatmeal Chocolate Chip Cookies


Made with old-fashioned oats, butter, and brown sugar, these Oatmeal Chocolate Chip Cookies are gloriously soft and chewy. Sometimes called a 'slow bend cookie', these sweet treats are much softer than traditional oatmeal cookies, with a heartier texture than ones typically made with quick cooking oats, which I find are perfect for making a delectable crumble topping for fruit crisps. 


Soft and Chewy Oatmeal Chocolate Chip Cookies
Makes about 60 cookies
Recipe courtesy of Sally's Baking Adduction

1 1/2 cups/188g all-purpose flour 
1 tsp ground cinnamon 
1 tsp baking soda
1 tsp salt
1 cup/230g unsalted butter, softened to room temperature
1 cup/200g) packed light or dark brown sugar
1/2 cup (100g) granulated sugar
2 large eggs, at room temperature
2 tsp pure vanilla extract
3 cups/240g old-fashioned whole rolled oats
1 3/4 cups semi-sweet chocolate chips


Whisk the flour, cinnamon, baking soda, and salt together in a medium bowl, then set aside. Using a stand mixer fitted with a paddle attachment, beat the butter on medium-high speed until smooth, about 1 minute. Add the brown sugar and granulated sugar and beat on medium-high speed until creamed, about 2 minutes. Add the eggs and vanilla and beat on high speed until combined, about 1 minute. Scrape down the sides and up the bottom of the bowl and beat again as needed to combine.

Add the dry ingredients to the wet ingredients and mix on low until combined. With the mixer running on low speed, beat in the oats and chocolate chips. The dough will be thick and sticky. Cover and chill the dough for at least 45 minutes in the refrigerator, which helps prevent the cookies from overspreading. Although, if chilling for longer than a few hours, allow to sit at room temperature for at least 30 minutes before rolling and baking because the dough will be quite hard.

Preheat the oven to 350°F. Line baking sheets with parchment paper or silicone baking mats, and set aside. 
Using a cookie scoop, about 1 tablespoon of dough per cookie, place the dough 3 inches apart on the baking sheets. Bake for 11 minutes or until lightly browned on the sides. The centres will look very soft. 

Remove from the oven and allow the cookies to cool on the baking sheet for 5 minutes before transferring to a wire rack to cool completely. While the cookies are still warm, you could press a few more chocolate chips into the tops for extra pizzazz. Cookies stay fresh covered at room temperature for up to 1 week.


Monday, August 16, 2021

Smoked Salmon Canapés with Cream Cheese & Dill


Sourced from the Bay of Fundy and sold at Caviar Direct in the St Lawrence Market, the artisanal smoked salmons they sell are sensational, but our favourite is their medium smoked “New York Style” variety. Lightly cured and cold-smoked, my husband bought this luscious smoked salmon as an appetizer for my recent birthday, and it was simply delicious. Creamy and buttery, it was the most refined smoked salmon I've ever enjoyed. And I adore salmon. Known for their ethically sourced gastronomic foods made with the finest natural ingredients and no preservatives, Caviar Direct also sells a premium selection of caviar, foie gras and truffles, for an absolutely decadent treat anytime of the year.


Smoked Salmon Canapés with Herbed Cream Cheese & Dill
Serves 4

8 oz 'New York Style' Smoked Salmon
12 oz Philadelphia Herb & Garlic Cream Cheese
1 baguette
Fresh dill, for garnish
Fresh cracked black pepper, optional

Slice the baguette diagonally into 1/4-inch thick rounds and spread with some of the herbed cream cheese mixture over each slice. Top each canapé with a generous piece of smoked salmon and garnish with a sprig of fresh dill and a fine grind of black pepper. Arrange on a decorative platter and serve.


Friday, August 13, 2021

Eggs Benedict with Buttery Hollandaise


Eggs Benedict is a deliciously decadent breakfast dish perfect for special occasions, and is even tastier with luscious lemon-scented hollandaise sauce served over perfectly poached eggs perched atop thick slices of warmed peameal bacon and garnished with fresh dill. Served with a flute of champagne and fresh squeezed orange juice, weekends just got a whole lot yummier.


Eggs Benedict
Serves 4

1 tsp vinegar
8 large eggs
4 English muffins
8 slices peameal bacon, warmed

Hollandaise Sauce:
4 egg yolks
1/3 cup butter, melted
2 tbsp lemon juice
1/4 teaspoon salt
1/8 tsp white pepper
2 tbsp chopped fresh dill 


In a small saucepan over medium heat, whisk the egg yolks until thick enough to coat back of spoon, about 4 minutes. Remove from the heat, and whisk in the melted butter, 2 tbsp at a time, until thickened. Then whisk in the lemon juice, salt, and white pepper. Keep the hollandaise sauce warm until ready to serve.

Pour enough boiling water into a skillet to come 3-inches up the side, and return to boil. Add the vinegar and reduce heat to gentle simmer. Break each egg into a small dish and gently slip into simmering water. Cook until your desired doneness, about 5 minutes for soft yolks and firm whites. Remove with slotted spoon and drain well on paper towel to dry egg.

Meanwhile, cut the English muffins in half and toast. To serve, place 2 halves, cut side up, on each pre-warmed plate. Top each with a slice of peameal bacon, poached egg and 2 tbsp of Hollandaise Sauce. Garnish with chopped dil, fresh fruit or sautéed diced potatoes.


Wednesday, August 11, 2021

Grandma's Apple Crisp: A Family Favourite


My Mom doesn't bake much anymore, but one of the desserts she does make is her delicious Apple Crisp, which she adapted from a recipe belonging to my Grandma. Mom says Gran used to sprinkle water on top for a crispier topping, but I think Mom's version is excellent just the way it is. I make about a dozen Apple Crisps every year with all the apples we grow on our terrace, which makes it a special home grown treat. An easy and delicious dessert anytime of the year, this recipe has truly stood the test of time, having been passed down through three generations: from my Grandma, to my Mom and now to me — confirming it as a absolute family favourite.


Mom & Grandma's Apple Crisp
Serves 4-6

5 or 6 golden delicious or Granny Smith apples, depending on the size
1/4 cup granulated sugar
2 tbsp fresh squeezed lemon juice
1 tsp ground cinnamon
2/3 cup all-purpose flour
1 cup brown sugar
2 cup Quaker Oats 
1/2 cup of slivered almonds, optional
2/3 cup melted butter


Peel, core and slice the apples into 3/4-inch pieces. Place them in a bowl and toss well with lemon juice, then add the sugar and ground cinnamon, and gently toss to coat. Pour the apples into an 8-inch square pyrex dish, so that it's almost filled to the top but enough room for about 1/2-inch of crumple topping. 

For the topping, mix the flour and brown sugar in a large bowl, then add the Quaker Oats (and almonds if using) and mix well. Pour the melted butter over the mixture and using your fingers, make sure it's thoroughly combined. Once done, add the topping evenly over the apples, spreading evenly to reach all the corners, then bake at 375°F for about 30 minutes. Serve warm or at room temperature with whipped cream or a scoop of vanilla ice cream. 


Monday, August 9, 2021

Shrimp Tacos with Guacamole & Chipotle Mayonnaise


Shrimp Tacos positively shout summer. Easy to prepare and a joy to eat, the only rule is having plenty of napkins on hand, because eating them is a messy business. One of my brothers favourite dishes, I made these shrimp tacos for lunch on a long weekend away with good friends. Living across from the St. Lawrence Market, I take advantage of Seafront Fish Market for buying all my fish and seafood, as well as Manotas Organics and Latin Foods which sells the freshest handmade guacamole, corn tortillas and pico de gallo salsa. Easypeasy. All that remains is making the chipotle mayonnaise and tangy coleslaw. Served with a jug of Sangria on a hot afternoon, these fabulous Shrimp Tacos are now one of our favourite summer dishes too. 


Shrimp Tacos with Guacamole & Chipotle Mayonnaise
Serves 4

16-20 corn tortillas
2 lbs extra large shrimp, peeled deveined and tails removed
2 tbsp olive oil
1 tsp lime juice

Chipotle Mayonnaise:
3/4 cup mayonnaise
1 chipotle in adobo pepper, finely chopped
1 tsp chipotle in adobo sauce
1 tsp lime juice

Coleslaw:
2 cup coleslaw mix
2 tbsp mayonnaise
1 lime, juiced

Guacamole:
2 ripe avocados
1/4 tsp salt, plus more to taste
1 tbsp fresh lime or lemon juice
2-4 tbsp minced red onion or thinly sliced green onion
Pinch freshly ground black pepper

Pico de Gallo:
2 to 3 medium fresh tomatoes, stems removed
1/2 medium red onion
1 jalapeño pepper, stems, ribs, and seeds removed 
Juice of 1 lime
1/2 cup chopped cilantro
Salt and pepper to taste


For the Pico de gallo Salsa, roughly chop the tomatoes, chili peppers, and onions. 
Place all of the ingredients in the bowl of a food processor fitted with the blade. Pulse only a few times, just enough to finely dice the ingredients and not enough to purée. Place in a serving bowl. Add salt and pepper to taste. Allow the salsa to sit for an hour, either at room temperature or chilled for the flavours to combine.

To make the guacamole, cut the avocados in half and remove the pit. Score the inside of the avocado with a blunt knife and scoop out the flesh with a spoon. Using a fork, roughly mash the avocado. Sprinkle with salt and lime juice. The acid in the lime juice will provide some balance to the richness of the avocado and will help delay the avocados from turning brown. Add the chopped onion, and season with pepper, if desired. Serve immediately, but if making a few hours ahead, place plastic wrap on the surface of the guacamole and press down to cover it to prevent air reaching it. 

To make the chipotle mayonnaise, mix together the mayonnaise with chipotle pepper, adobo sauce and lime juice until well blended. Set in fridge until ready to use. For the coleslaw, simple combine the coleslaw mix with a little mayonnaise and a squeeze of fresh lime juice, to taste. Cover and refrigerate until needed.

In a bowl toss the shrimp with oil and lemon juice. Preheat an outdoor grill to medium high. Once hit, add the shrimp and cook for 3-4 minutes each side until the shrimp is pink and opaque. 

Just before serving, warm the tacos. Place all the condiments on the table and let guests fill the warm tortillas with coleslaw, shrimp, guacamole, salsa and shrimp finished with a drizzle with chipotle sauce. 


Friday, August 6, 2021

Cory & Richards Long Weekend Culinary Feast


Sharing special times with good friends is one life's greatest pleasures. Invited for a wonderful long weekend at 'Hilltop', our friends new custom built home set amid the bucolic splendour of southwestern Ontario and overlooking acres of idyllic farmland, we spent four glorious days celebrating being together for the first time in almost a year. With our shared passion for cooking, we each addded to the weekends feast including a delicious Sunday dinner created by Cory and Richard. Beginning with Caprese Skewers, a lovely appetizer of miniature balls of mozzarella skewered with sweet basil leaves and juicy grape tomatoes served with a tangy-sweet balsamic reduction, which was followed by Cory's grilled locally farm raised ribeye steaks which were carved and garnished with a pungent chimichurri sauce. With fresh rhubarb freshly picked from his Mom's garden earlier in the day, Cory made his yummy Rhubarb Strawberry Crisp with a dollop of iced cream for dessert. Meals shared are memories made, and we certainly made lots of great memories this past long weekend.


Grilled steaks with chimichurri sauce

Sautéed zucchini with garlic and grated parmesan cheese

Sensational Steak Dinner with green salad and sautéed zucchini 

Rhubarb and Strawberry Crisp with Vanilla Iced Cream made with handpicked rhubarb 
from Corys Mom's garden


Chimichurri Sauce
Serves 6-8
Recipe courtesy of America's Test Kitchen

1/4 cup hot water
2 tsp dried oregano
2 tsp kosher salt
1 1/3 cups loosely packed flat-leaf parsley leaves
2/3 cup loosely packed cilantro leaves
2 tbsp minced garlic 
1/2 tsp red pepper flakes
1/4 cup red wine vinegar
1/ 2 cup extra-virgin olive oil


Combine hot water, oregano, and salt in small bowl and let stand 5 minutes to soften the oregano. Pulse parsley, cilantro, garlic, and red pepper flakes in food processor until coarsely chopped, about ten 1-second pulses. Add water mixture and vinegar and pulse briefly to combine. Transfer mixture to medium bowl and slowly whisk in oil until incorporated and mixture is emulsified. Cover with plastic wrap and let stand at room temperature at least 1 hour. If preparing the sauce in advance, refrigerate and bring to room temperature before using. This sauce can be made up to 3 days in advance.


Wednesday, August 4, 2021

Grilled Asian-Style Chicken Thighs with Lemon


A sensational marinade for poultry, this fragrant Asian-inspired recipe is perfect for satays, cornish hen, chicken breasts or plump juicy thighs. With a sweet delicate flavour, the marinated chicken caramelizes beautifully on the grill, allowing the intoxicating character of the marinade to shine through. Basting the chicken while on the grill ensures that the chicken stays moist and flavourful, as well as producing attractive grill marks for a lovely presentation. One of my favourite summer recipes, this Asian-Style chicken is delicious served with grilled zucchini and my friend Richards amazing Curried Couscous.


Grilled Zucchini garnished with shaved parmesan 

Curried Couscous


Grilled Asian-Style Chicken Thighs
Serves 8

12 chicken thighs, bone-in and skin-on
5 tsp black pepper
5 tsp cumin
5 tsp ground coriander
3 tsp turmeric
4 tsp garlic, minced
5 tbsp white sugar
5 tbsp vegetable oil
5 tbsp soy 
5 tbsp lemon juice
5 tsp fish sauce

Trim the thighs of any excess fat then place into a large bowl with all the marinade ingredients. Cover and refrigerate at least 2 hours, or up to 48 hours. Preheat an outdoor BBQ to high and grill the chicken thighs skin side first for about 6-8 minutes depending on the size, then turn them over for another 6-8 minutes, or until cooked through and deep golden brown with nice grill marks. Delicious served with some grilled vegetables or a light green salad.